
Deep dive into ticket reassignment with Explore reports
FeaturedTL;DR
This post utilises many Explore features to get a detailed report on ticket reassignment. The report will include:
- Before and after assignee changes for each ticket.
- Workaround for data limitation around previous assignee name.
- Filter based on the agent who performed the reassignment.
- An example on how the report can be cloned and adapted for different use cases.
We will take an iterative approach with increasing complexity to clarify the logic behind every step. It will only focus on assignee rather than group assignment in order to manage the scope.
What you'll need
- Zendesk Explore Professional or Enterprise
- Editor or Admin permissions (seeGiving agents access to Explore)
- Ticket data in Zendesk Support
Creating the report
- In Explore, click the reports icon in the left navbar.
- In the Reports library, clickNew report。
- On the选择一个数据集page, clickSupport>Support -更新历史记录, then clickStart report。
- Enter a user-friendly name for the report (e.g.Ticket reassignment)
- In theMetricspanel, clickAdd。
- From the list of metrics, chooseUpdates>Updates, then clickApply。这个指标将显示的次数tickets have been updated by anyone.
- In theFilterspanel, clickAdd。
- From the list of attributes, chooseTicket field changes>Changes - Field name,Ticket field changes>Changes - Previous value, andTime - Ticket update>Update - Datefilters, then clickApply。
- Click theChanges - Field namefilter you just added. On theSelectedtab, selectassignee_id。This filter will narrow down ticket updates to those that include assignee change.
- Click theChanges - Previous valuefilter. On theExcludedtab, selectNULL。This filter will exclude new tickets' first assignment.
- Click theUpdate - Datefilter. ClickEdit date ranges。Select a timeframe (e.g. last month). You will likely override this filter with a dashboard filter at a later stage, but it is necessary to limit the dataset while creating the report to avoid long loading times or even failure to render data.
- Click Save.
The report now renders a KPI visualisation of the number of ticket reassignment in the last month. This is different from the metricAssignee reassignmentsince the later excludes tickets re-assigned to a group.

Data break down
The second iteration of the report will list the old and new assignees in those updates. The attribute names are intuitive and reflect exactly that:
- In theRowspanel, clickAdd。
- From the list of attributes, chooseTicket>Ticket ID,Ticket field changes>Changes - Previous valueandTicket field changes>Changes - New value, then clickApply。
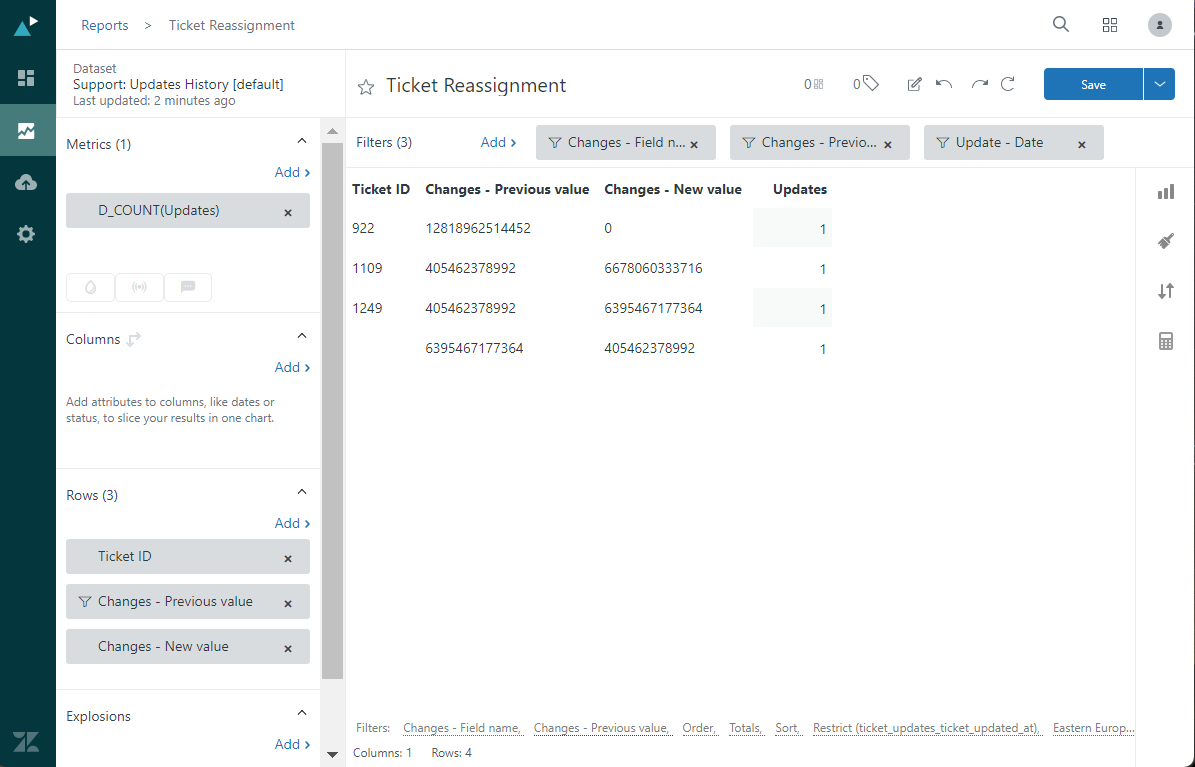
Now the visualization changes into a table and breaks down the number of updates (assignee changes) for each ticket updated within the specified time range by all its reassignments combinations.
The ID "0" indicates no assignee. However this still does not include any new tickets. So, tickets that are reassigned from "0" must have gone through a round of assignment and un-assignment.
Improving readability
The third iteration of the report will try to convert those IDs to legible data. Afterall, we would rather know the agent name.
Fortunately, for the new assignee, there is an attribute for the name:
- In theRowspanel, removeChanges - New valuethat you added earlier, then clickAdd。
- From the list of attributes, chooseTicket field update values>Update ticket assignee, then clickApply。
Unfortunately, for the old assignee, the name is not saved in the dataset. However, we can try to cross-reference it. This will work in SOME cases. For example, it is often that the old assignee will perform the reassignment themselves. In this case, we can cross-reference the old assignee_id with the updater_id and display the updater name, which is part of the dataset, whenever there is a match. We can also cross-reference the old assignee_id with the final assignee_id of the ticket, in case the ticket is reassigned back to them. If we get no match still, the least we can do is make the id a hyperlink to the agent profile.
- In the Calculations menu, clickStandard calculated attribute。
- On theStandard calculated attributepage, give your attribute a name such asUnassigned agent。
- In theComputed fromfield, selectUpdate ID。
- In theFormulafield, enter the following formula:
IF ([Changes - Field name]="assignee_id"
AND [Changes - Previous value]="0")
THEN ""
ELIF ([Changes - Field name]="assignee_id"
AND [Changes - Previous value]!=NULL
AND [Changes - Previous value]=[Updater ID])
THEN [Updater name]
ELIF([Changes - Field name]="assignee_id"
AND [Changes - Previous value]=[Assignee ID])
THEN [Assignee ID]
ELIF([Changes - Field name]="assignee_id"
AND [Changes - Previous value]!=NULL
AND [Changes - Previous value]!=[Updater ID]
AND [Changes - Previous value]!=[Assignee ID])
THEN LINK("/agent/users/" + [Changes - Previous value],[Changes - Previous value])
ENDIF

Add the calculated attribute to the report:
- In theRowspanel, removeChanges - Old value, then clickAdd。
- From the list of attributes, chooseCalculated attributes>Unassigned agent, then clickApply。
Enable hyperlinks in your table:
- From theVisualisation typemenu in the right navbar, SelectTable。
- From theChart configurationmenu in the right navbar, SelectChart。
- Scroll down toText interpretationand selectHTML。
Add more context to every update:
- In theRowspanel, clickAdd。
- From the list of attributes, chooseUpdater>Updater name, then clickApply。

Now the table shows the new assignee name, some of the old assignee names, and those without names have an ID that is a hyperlink to their profile. Not a 100% solution, but definitely an improvement. You can also see the name of the agent that performed every update.
Create a new filter
The fourth iteration of the report will add a filter to manage large number of updates in your report and group them in logical subsets. You may notice a pattern where tickets are either reassigned by the original assignee,takenby the new assignee, reassigned by the system (trigger or automation), or by another agent. So we will create a filter that does exactly that. This could be helpful while trying to understand why a ticket was reassigned.
- In the Calculations menu, clickStandard calculated attribute。
- On theStandard calculated attributepage, give your attribute a name likeAssignee updater's relationship to the ticket(not my best title).
- In theComputed fromfield, selectUpdate ID。
- In theFormulafield, enter the following formula:
IF ([Changes - Field name]="assignee_id"
AND [Updater ID]=NULL)
THEN "System"
ELIF ([Changes - Field name]="assignee_id"
AND [Updater ID]=[Changes - Previous value])
THEN "Previous assignee"
ELIF ([Changes - Field name]="assignee_id"
AND [Updater ID]=[Changes - New value])
然后“新assignee"
ELIF ([Changes - Field name]="assignee_id"
AND [Updater ID]!=NULL
AND [Updater ID]!=[Changes - Previous value]
AND [Updater ID]!=[Changes - New value])
THEN "Someone else"
ENDIF
- In theFilterspanel, clickAdd。From the list of attributes, chooseCalculated attributes>Assignee updater's relationship to the ticket, then clickApply。

You can use the new filter to display a subset in the report itself, create a variation of the report, or include it as a dashboard filter to give viewers the freedom to select the desired subset.
Clone and tweak the report
It's easy to pivot to various use cases using the report we just built. Let's say you wish to monitor tickets where agents unassign themselves and put it back on queue.
- Save the last iteration of the report, then from the save menu, selectSave as new。


- Give the report a descriptive name such asTickets unassigned back to queue by assignee。
- In theFilterspanel, clickAdd。From the list of attributes, chooseTicket field changes>Changes - New value, then clickApply。
- Click theChanges - New valuefilter you just added. On theSelectedtab, select0。This filter will only display tickets where the assignee is removed (assigned to a group).
- Click theAssignee updater's relationship to the ticketfilter. On theSelectedtab, selectPrevious assignee。

- In theRowspanel, removeUpdate ticket assigneesince it will always be empty andUpdater namesince it will always be equal to theUnassigned agent。
- Save the report.


Note that the name of the unassigned agent will always be displayed in this report.
Do you have any improvements to these reports? Questions? Requests for specific use case? Let me know in the comments.
-
Thanks for sharing this Explore recipe,Ahmed Zaid! Amazing.
-
Awesome tip, Ahmed!
Pleasesign into leave a comment.
2 Comments