


The ZendeskTime Tracking apphelps support managers gain visibility into the actual time spent across all your customer service interactions within a ticket. The app tracks the time spent on each ticket update, and stores this with the ticket. With Explore, you can create calculated metrics that contain this information, and use them to produce reports. Use this article to learn how to set up custom time tracking metrics and produce three sample reports.
In this article:
Choosing the approach
As with any other Support ticket data, there are two approaches for analyzing the time tracking app data.
Ticket handling time
The first approach is to look at the handling time per ticket. It can be used to analyze agent performance when the ticket is handled mostly by the same agent and for reporting on time your team spent supporting a specific end-user or organization.
If you choose to go with this approach the best place to create your reports is theSupport: Tickets数据集。您可以创建两个简单的计算ated metrics based on theTotal time spent (sec)metric and use them to report on the handling time per ticket alongside the native time metrics.
Metrics that can be created to support this approach are:
- Ticket handling time (min)
- Ticket handling time (hrs)
Update handling time
The second approach is to look at the handling time per update. It is the best way to report on the agent performance and it is suitable for the complex workflows where the same ticket is handled by multiple agents.
For this approach, the calculated metrics and reports should be created in theSupport: Updates historydataset based on the data stored in theChanges - Previous valueandChanges - New valueattributes. You can use the NUMBER() function to transform the text attribute values into numbers.
Metrics that can be created to support this approach are:
- Update handling time (min)
- Update handling time (hrs)
Creating the metrics
If this is the first time you've created a calculated metric, seeCreating standard calculated metrics and attributes.
To create the metric
Repeat the following general procedure to create each custom metric. Use themetrics configurationsection to find the information you'll need to create each one.
- In Explore, click the reports (
 ) icon.
 - In the Reports library, clickNew report.
- On theSelecta datasetpage, clickSupportand select the appropriate dataset for the metric you're creating (更新历史记录forupdate handling metrics, orTicketsforticket handling metrics), then clickStart report. The report builder opens.
- From the calculations menu (
 ), clickStandard calculated metric.
 - On theStandard calculated metricpage, enter a name for your calculated metric from the list below, for exampleUpdate handling time (min).
- In theFormulafield, enter or paste the formula you want from themetrics configurationsections. The example immediately below is for theUpdate handling time (min)metric:
IF ([Changes - Field name] = "Total time spent (sec)")
THEN
IF ([Changes - Previous value]=NULLOR [Changes - Previous value]="")
然后数量((变化——新值))/60
ELIF (REGEXP_MATCH([Changes - New value], "[0-9]+") AND REGEXP_MATCH([Changes - Previous value], "[0-9]+"))
THEN(NUMBER([Changes - New value])-NUMBER([Changes - Previous value]))/60
ENDIF
ENDIFIf you are creating theUpdate handling time (min)metric, theStandard calculated metricmenu would look like this:Note: The formulas in this article won't work if the user profile is set to a non-English language. If your user profile in Explore isn't in English, follow the instructions in this article to make the formula work: 我将探索如何从英语公式吗to another language?
- If your user profile language is not in English replace the attribute names in the formula with attributes in your language. For example, in German the formula will look like this:

- When you are finished, clickSave.
- In theMetricspanel, clickAdd.
- From the list of attributes, expand theCalculated metricsfolder, find your calculated metric, then click the pen icon next to it.
- From theOptionsmenu of theStandard calculated metricspage, chooseEdit aggregators.
- Set themetric's default and visible aggregators. If you are creating theUpdate handling time (min)metric the aggregator menu looks like this:

- Continue creating the calculated metrics as shown below.


Metrics configuration
Metric name: Ticket handling time (min)
This metric should be created in theSupport: Tickets数据集。It returns the time spent by agents per ticket, calculated in minutes.
Copy and paste this formula into the formula field of your standard calculated metric:
VALUE(Total time spent (sec))/60Supported aggregators when you use this metric in a report: SUM, AVG, MIN, MAX, MED
Metric name: Ticket handling time (hrs)
This metric should be created in theSupport: Tickets数据集。It returns the time spent by agents per ticket, calculated in hours.
Copy and paste this formula into the formula field of your standard calculated metric:
VALUE(Total time spent (sec))/60/60Supported aggregators when you use this metric in a report: SUM, AVG, MIN, MAX, MED
Metric name: Update handling time (min)
This metric should be created in theSupport: Updates history数据集。It returns the time spent by agents per ticket update, calculated in minutes.
Copy and paste this formula into the formula field of your standard calculated metric:
IF ([Changes - Field name] = "Total time spent (sec)")
THEN
IF ([Changes - Previous value]=NULLOR [Changes - Previous value]="")
然后数量((变化——新值))/60
ELIF (REGEXP_MATCH([Changes - New value], "[0-9]+") AND REGEXP_MATCH([Changes - Previous value], "[0-9]+"))
THEN(NUMBER([Changes - New value])-NUMBER([Changes - Previous value]))/60
ENDIF
ENDIF
Supported aggregators when you use this metric in a report: SUM, AVG, MIN, MAX, MED
Metric name: Update handling time (hrs)
This metric should be created in theSupport: Updates history数据集。It returns the time spent by agents per ticket update, calculated in hours.
Copy and paste this formula into the formula field of your standard calculated metric:
IF ([Changes - Field name] = "Total time spent (sec)")
THEN
IF ([Changes - Previous value]=NULLOR [Changes - Previous value]="")
然后数量((变化——新值))/60/60
ELIF (REGEXP_MATCH([Changes - New value], "[0-9]+") AND REGEXP_MATCH([Changes - Previous value], "[0-9]+"))
THEN(NUMBER([Changes - New value])-NUMBER([Changes - Previous value]))/60/60
ENDIF
ENDIF
Supported aggregators when you use this metric in a report: SUM, AVG, MIN, MAX, MED
Example 1: Ticket handling time by ticket ID
In this example, you'll produce a list of tickets with their handling time and some additional attributes.
Before you start, ensure you've created the custom metrics shown previously.
- In Explore, click the reports () icon.
- In the Reports library, clickNew report.
- On theSelecta datasetpage, clickSupport>Support - Tickets, then clickStart report. The report builder opens.
- Now, add your metrics. In theMetricspanel, clickAdd.
- From the list of metrics, chooseCalculated Metrics>Ticket handling time (min),then clickApply.
- In theRowspanel, add the attribute you want to report against the metrics. ClickAdd.
- From the list of attributes, expandTicket, and then chooseTicket ID.
- ExpandAssignee, and chooseAssignee name.
- ExpandRequester, and chooseRequester name.
- ExpandTime - Ticket solved, and chooseTicket solved - Date.
- Click on one of theTime - Ticket solved, thenDate rangeand select the time period you wish.
- From the visualizations menu (
 ), chooseTable.

Example 2: Ticket handling time by month and organization
在这个例子中,你会产生一个图表显示tal ticket handling time and average ticket handling time by month and organization.
Before you start, ensure you've created the custom metrics shown previously.
- In Zendesk Explore, click the reports () icon.
- In the Reports library, clickNew report.
- On theSelecta datasetpage, clickSupport>Support - Tickets, then clickStart report. The report builder opens.
- Now, add your metrics. In theMetricspanel, clickAdd.
- From the list of metrics, chooseCalculated metrics>SUM(Ticket handling Time (hrs))andAVG(Ticket handling time (min)), then clickApply.
- From the visualizations menu (), chooseLine.
- Click theAVG(Ticket handling time (min))metric you just added, then selectDual.
- In theColumnspanel, add the attribute you want to report against the metrics. ClickAdd.
- From the list of attributes, chooseTime - Ticket created>Ticket created - YearandTicket created - Month, then clickApply.
- Click theTicket Created - Month, thenDate rangeand select the time period you want.
- In theRowspanel, add the attribute you want to have in the row selector. ClickAdd.
- From the list of attributes, chooseTicket organization>Ticket organization name, then clickApply.
- Click theTicket organization name,and choose the organizations you want to look at.
- You can adjust the chart colors, labels and more in the chart configuration menu (
 ).
).
You'll end up with a chart that looks like this:

Example 3: Update handling time by agent
In this example, you'll generate a graph showing agents with the top ten average handling time.
Before you start, ensure you've created the custom metrics shown previously.
- In Zendesk Explore, click the reports () icon.
- In the Reports library, clickNew report.
- On theSelecta datasetpage, clickSupport>Support - Updates history, then clickNew report. The report builder opens.
- Now, add your metrics. In theMetricspanel, clickAdd.
- From the list of metrics, chooseCalculated metrics>AVG(Update handling time (min)), then clickApply.
- In theColumnspanel, add the attribute you want to report against the metric. ClickAdd.
- From the list of attributes, chooseUpdater>Updater name, then clickApply.
- In theFilterspanel, add the attributes that will refine the results. ClickAdd.
- From the list of attributes, chooseUpdater>Updater role, then clickApply.
- Click theUpdater roleattribute you just added and selectAdminandAgentfrom the menu.
- In theFilterspanel, clickAdd
- From the list of attributes, chooseTime - Ticket update>Update - Date, then clickApply.
- Click theUpdate - Datefilter you just added, then clickDate rangeand select the time period you want to show.
- From the visualizations menu (), chooseBar.
- To show only the top ten users, in the result manipulation menu (
 ), clickTop/bottom. On theTop/bottompage, selectTop, then set the number to10.
 - Adjust colors, labels and other customizations in the chart configuration menu ().
You'll end up with a chart that looks something like the following:

105 Comments
I am getting an issue with the first metric
The use of the word 'Simply' throughout these instructions is frustrating.
Thanks for that feedback, Ryan. We'll share it with the documentation team.
Is there something I an import into explore without having to manually create the metrics to then have the dashboard?
I'm trying to build a report that identifies the amount of time spent per update by the group the ticket was assigned to. Two years ago, a Zendesk rep posted this solution:
However, I do not believe this is accurate. The definition of Update Ticket Group is:
The group to which a ticket was assigned at the end of an update. For example, if a ticket was reassigned from Tier 1 to Tier 2, the attribute returns Tier 2.
What we want to capture is the group at the *beginning* of the update, because the agent who performs the update is likely a member of *that* group, not the group the ticket is *handed off to*.
How can we report using the group the ticket was assigned to *before* the update was completed?
Ideally we would instead use the fact "Updater group", but that doesn't seem to be a fact that's available in the update dataset.
i believe i followed the guide - but the numbers i am getting is too high to fit the actual time spent.
It would be impossible for us to spend 778 hours on one client in 2020?
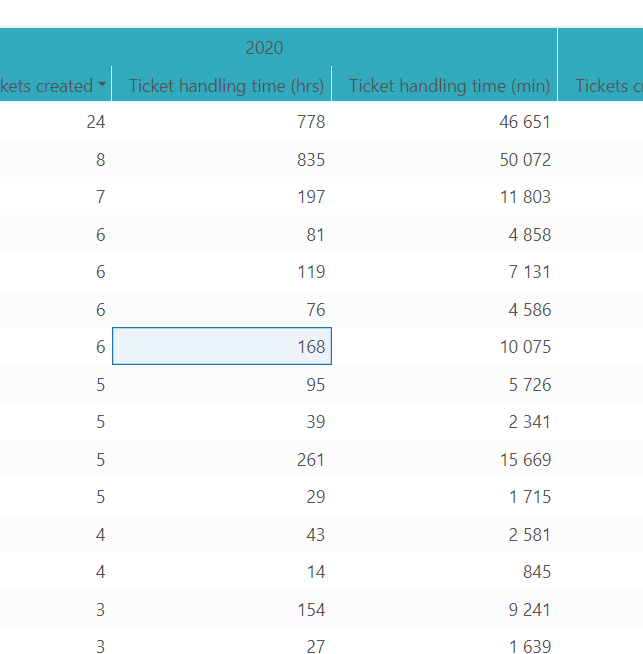
What am i doing wrong? I doublechecked my calculated metrics.
Hi Alexia -
It may be that you have one or more tickets from that client where the tracked time was accidentally left running for a long time, for example if someone was working on a ticket on a Friday and left it open over the weekend, and only submitted the ticket when they returned.
Here's what I'd suggest: use theTicket handling time by IDrecipe above, and add a filter for the Organization in question, to look at the handling time of those 24 tickets, to see if there's an abnormally high outlier that can explain the discrepancy. Unfortunately, there isn't a way to modify the time tracked on a ticket once it's been submitted, but it could point you to an agent who might need refresher training on the use of the app.
@...
Not sure if you have figured this out but you were getting an error because the metric you were trying to create should have been created in the Ticket Updates dataset. Each metric formula in the article has a note to point out which datasets you need to use.
Does anyone from Zendesk have input on my question from 20 days ago?
https://support.zendesk.com/hc/en-us/articles/360022186134/comments/1260800283650
I am trying to get the time spent on a ticket in a given month. The account as the Time Tracking app. I am using the Support Tickets Data Set, and I copied and pasted theUpdate handling time (min)formula. But Explore keeps giving me a error (and the formatting in the formula doesn't match the example. What am I doing wrong?
Never mind, I read the article a little closer. I think I know what my mistake is
What best practices should I suggest to my agents while using the app.
There is insufficient documentation with the app itself for me to understand the settings without just trial and error.
What is meant by "navigates away from the ticket" for the auto pause. Is it switching tabs? Changing windows?
Does anyone have any advice?
Hi@...,@...,@...and anyone else. I'm experiencing a very strange issue that the Time Tracking app seems to be tracking less time and not including calls. If you look at the following screenshot, you'll see the initial call was almost 11 minutes, but the time tracking in total was only 378 seconds (6 mins and a bit).
Does the time tracking app not include the calls? I would have assumed it did. Do we know exactly what it does include and when? Does it not include first calls?
Is this a bug?
Hi@...

Thanks for this question.
Essentially the Time Tracking app only adds time to a ticket, if the agent makes an update to the ticket after spending the time on that ticket.
In the case of the call, the app does not add a time spent for the initial call update on the ticket.
Only once the agent updates the ticket (in your case after the agent spent 378 seconds filling out fields and maybe following up with the client, this will be added by the time tracking app to the ticket.
Here is an example from my own test account, which shows this:
The purpose of the app is essentially to track the time the agent took to work on the ticket.
So you would have to use the Talk Dataset and calculate the call time also if you wanted to have both the time of the call and the time the agent spent working on the ticket.
I hope this helps answering your question.
Thanks for that! What about subsequent calls to the customer while the agent is on the ticket. Does that accrue time? And if that does, what if an agent then switches to another ticket, does that pause time?
Hey@...

No problem! As for your new questions:
Time Tracking App does not add time to the ticket for outbound calls.
Same as for the inbound calls, the call itself does not add the time spent on the ticket.
Only any manual update after the call made by the agent will add the time spent.
I'm adding another screenshot here for you:
In regards to the time where agents are away from the ticket:
Note that the Time Tracking App calculates the time spent as long as the agent has the ticket tab open. Should the agent navigate away from that browser-tab for example, this will still continue counting.
The only time where the tracker will reset or stop is, if the agent closes the ticket tab without submitting the ticket.
With that said, keep in mind that The Time Tracking App will only add time to the ticket if the agent actually hits "submit as [status]"
I hope this explains the behaviour of the app.
That answers it, thank you!
I keep getting an error when trying to pull data using the standard formulas above.
Here is the copied formula - syntax error doesn't allow me to save.
deleting the second ) allows me to save but the calculation doesn't work. It gives me the error.
@...Try adding a space between "spent" and "(" and I believe that should resolve the issue for you. The full formula should look like this: VALUE(Total time spent (sec))/60
Hello ZenDesk Team!
I copied the formula provided:
@...Based on that error message, I have a feeling you may have been using the Tickets dataset when building that metric since the 'Changes - New Value' attribute is only available in the Ticket Updates dataset.
Mind double checking to ensure that you're building this metric in the Ticket Updates dataset?
Hi! I am trying to run the Update Handling Tim (min) metric in Explore but keep recieving the message below, depsit copying and pasting from the formula above? Any idea's?
I can't see the error in the metric so struggling on this one.
Thank You!
HeyTom- Mind confirming that you're using theTicket Updatesdataset instead of theTicketsdataset? The 'Changes - New Value' attribute is only available in theTicket Updatesdataset, so that might explain the error message you're seeing if you happen to be in a different dataset.
Hi, "Avg Ticket Handling time (min)" rounds to the nearest minute on the graph. How do I view the exact handle time? For example, our handle time in mins for June is not 6, according to the graph, it's less than 6.
@...If you click into Chart Configuration from the right-side menu and then click on Display Format, you should be able to specify the format by selecting Custom from the dropdown menu next to this metric.
我需要找到最好的方法来衡量多长时间ticket takes to be resolved by my engineering team. I do not currently have advanced queries. What would be the best way to measure?
Hi Kate! The best way to create these queries if the default queries do not meet your requirement is via Explore. I can see your current plan is Explore Lite. For creating custom queries you need Explore Professional, included in our Suite Professional plan. You can compare our plans prices and featureshere
Best regards, Atenciosamente
Diogo | Customer Advocate | Zendesk Certified Support Administrator
Having issues? Try clearing your cache and cookies!||||Join our community! Find advanced answers and share your own!
Hi@...: Could you point me towards what custom inputs to select in "display format" to get the exact AHT to displayhttps://share.getcloudapp.com/4gun6jxw?
Hey@...- Happy to help! The solution I had in mind was to select "Custom" as the Display Format for that metric and then specify a different Decimal Place to round it to (i.e. "2" or "4" instead of "0"). This would help solve for the problem you previously described in terms of getting a more precise number rather than using Zendesk's default rounding.
While I'm not sure if there would be a way to get the exact AHT time to display, it looks like a workaround would be to enter a really large value (ie. 30) and that should help you find the exact AHT time.
For instance, below is an example of what I see in one of my own time tracking queries (table) when I round that metric to 30 decimal places:
@...are you looking for something like below?
Pleasesign into leave a comment.