
Regardless of the type of customer support you provide, the one constant for all support organizations is that customers seek you out to help them resolve their issues. Here are some of the options that your customers have for contacting you:
- Send an email
- Fill out a support request form in your Zendesk Support portal
- Fill out a support request form on your own website
- Call you on the telephone
- Text chat with you
- Send you a Tweet
- Post on your Facebook wall
All of these communication options are referred to aschannels。You decide what channels you want to enable in your Zendesk account and how your customers can reach you.
You can open even more ways of communicating with your customers by addingappsto your account. These give you additional functionality and connect you with many popular internet products and services such as Salesforce, JIRA, and SugarCRM.
All support requests, from all channels, become Zendesk Supporttickets。票捕获客户的初始请求for support and all the conversations your agents have with the customer along the way to solving their support issue.
Try it yourself: Create a ticket now
If you've already set up your trial account, you can create a test ticket right now, start testing out Zendesk Support, and see what a typical ticket looks like.
- Imagine you've just purchased a new product (in this case a camera) and something's not working correctly. You’re going to ask for help by requesting support using your email account. Send an email from an email account that you didnotuse to set up your Zendesk Support trial to your Zendesk account. You do this by simply addressing an email to support@thenameofyouraccount。zendesk.com. When you send the email, a new ticket will be created.
- Log in to your Zendesk account, then click theViewsicon (
 ) in the sidebar.
 - You'll find your new ticket in theUnassigned Ticketsview. Click the title of that view.

- Click the title of the new ticket to open it.
We'll take a look at all the components of a ticket on the next page.
Anatomy of a ticket
With your ticket open in front of you, you can see all the different parts of the ticket.
Ticket creation
This ticket was automatically created based on the request you sent in earlier. At the top of the ticket interface, you see a tab with the ticket number for this ticket. When you receive a request in your account, a new ticket is automatically created.
However, there are certain times when you need to create a ticket manually, on behalf of your customer. You can do so using the+Addbutton.

Ticket subject and comments
In the main body of the ticket, you can see that the ticket includes thesubjectanddescriptionof the support request you sent by email. The support request you submitted earlier is the first comment in the ticket and the email subject becomes the title of the ticket.

The first comment of the ticket contains the content of the email request you sent. Below the first comment, you see that a new empty comment is open and ready for you (as the agent) to enter a response. The comment area includes a text toolbar you can use to format your response, add attachments, and so on.
By default, a comment you enter as aPublic replywill be public and visible to everyone who views this ticket, including the person who requested support. The ticket also includes aCCfield, you can use to copy other external users on your reply.
You can also add private comments (referred to as anInternal Note). The requester never sees these notes, they are used for internal communication only. For example, an agent may need to get advice from another agent to solve the requester's support issue. If you want to add an internal note, click that tab.
Just below the title (subject) of the support request, you see the name of theticket requester,机票的日期和时间创建,和在哪儿e the ticket originated from. In this case, the request was sent via email. Zendesk shows you what channel was used to generate the support request.

Ticket properties panel
To the left of the ticket conversation, you'll see the ticket properties, includingticket fields, which include the person or group assigned to the ticket and any internal users (followers) who will receive ticket updates.

Above the ticket fields are two buttons you can use to toggle between the ticket properties (![]() ) and context information (
) and context information (![]() ) about the user who submitted the request. If you're using the Zendesk Agent Workspace,context informationabout the user appears on the right side of the ticket conversation, instead of the left.
) about the user who submitted the request. If you're using the Zendesk Agent Workspace,context informationabout the user appears on the right side of the ticket conversation, instead of the left.
For now, we're only concerned with theAssigneefield (we'll explain the others in another lesson).
All tickets need to be assigned to an agent so that they can be solved and closed. Assuming you've just started your trial account, you're the only user in your Zendesk Support instance so in the next step you'll assign the ticket to yourself.
Ticket actions
At the bottom of the ticket, you see aSubmitbutton.

When you finish adding a comment to the ticket, click this button to save your comments and submit the changes you’ve made. By default, any public replies you add to a ticket are sent to the ticket requester when you clickSubmit。
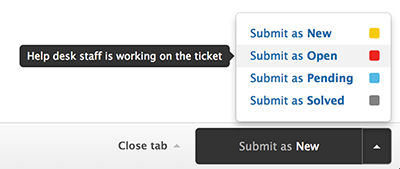
When you submit a ticket, you can also change theticket status。Ticket status can beNew,Open,Pending, orSolved。
The bottom of the ticket also includes anApply macrosbutton. You can usemacrostoreply to support requests that can be answered with a single, standard response.
Ticket user roles
As you begin to work with tickets you’ll see that there are several types of users associated with a ticket:
- Every ticket contains the name of the person who requested support, referred to as therequester。
- Once an agent is assigned to the ticket, the agent becomes theassignee。
- If an agent opens a ticket for a customer, the agent is thesubmitter。
- If the agent invites other internal users to view the ticket, they arefollowers。
Try it yourself: Assigning a ticket to yourself
If you want to try assigning and opening a ticket, follow these steps:
- Open the ticket you created, then click the down arrow next to theAssigneefield and select your name. Alternatively, to save searching for your name, clicktake itnext to theAssigneefield.
- You can also set theTypeandPriorityfields. Each are drop-down lists with pre-defined options. SetTypetoProblemandPrioritytoNormal。
- To save these changes click theSubmit as newbutton on the bottom right of the page. When you assign a ticket to an agent, it is automatically set toOpen。
After a ticket is assigned to an agent, they'll work to solve the ticket and ensure that the customer is happy. Some tickets can be solved with a simple standard response for a common issue such as resetting a password. Other issues that are more complex may require research, collaboration with other agents or people within your company, or gathering more information from the customer.
How are tickets assigned to agents?
Tickets can be assigned both manually and automatically. You can manually assign a ticket to yourself or to another agent, allow agents to assign themselves to tickets, or you can set up Zendesk Support to automatically assign tickets to a group or specific agent.
You'll most likely set up a mix of both manual and automatic ticket assignments. Some larger support teams delegate management of their ticket queue to a support lead or manager and those people assign tickets to agents.
On the next page, you'll see the typical journey a ticket takes from arriving in Zendesk Support to being solved.
The ticket life cycle
Each ticket has a life cycle. In other words, the stages it goes through as it arrives in Zendesk Support until it is solved.
Here are the typical stages:
- When a Zendesk Support request first arrives, it becomes a ticket and is automatically set toNew。
- When an agent is assigned to the ticket, the ticket is automatically set toOpen。
- 如果代理有cust后续问题omer, the agent will set the ticket toPending, which means that the agent is waiting for more information from the customer.
- When the agent resolves the issue, they will set the ticket toSolved。
- Finally, after a certain number of days, the ticket is automaticallyClosedand archived for later reference. Agents will never manually set a ticket to closed (which is why you don't see it as an option on theSubmitbutton).
Agents expect that when they set a ticket to solved the customer's issue has been resolved and the conversation around that particular issue is over. However, if the customer doesn't feel the same way, they can respond back to the agent by replying to the "ticket solved" email notification. When this happens, the ticket is reopened and it's the agent's job to follow up and go through the ticket lifecycle again.
In the next lesson, we'll show you how you can view your tickets using any number of criteria. For example, you can quickly see all the tickets that have been set toSolved, all the tickets assigned to a particular agent, and so on.

A quick tour of the Zendesk Support agent interface
Before you move on to the next lesson, watch this video that gives you a quick tour of Zendesk Support so you know where to find all the tools you'll use to manage your tickets and users and configure Zendesk Support.
Zendesk overview demo (2:29)
0 Comments
Pleasesign into leave a comment.