
- Multibrand设置(Part 1): Legacy Zendesk Chat (standalone)
- Multibrand设置(Part 2): Zendesk Chat in the Web Widget (Classic)
- Multibrand设置(Part 3): Best Practices
If you are using theChat Phase 3 Chat-Support integration, you first need to set up multiple brands in Zendesk, and use theWeb Widget (Classic).
Step 1: Set up multiple brands in Zendesk
Your Zendesk account has one brand by default, but on some plans you can set up and support multiple brands.
Read our guides onsetting up multiple brands in Zendesk.

Step 2: Add the Web Widget (Classic) to your brands in Zendesk
TheWeb Widget (Classic) supports Multibrand. Here’s how this works:
- A customer can haveone Web Widget (Classic)per brand
- Each Web Widget is made up of:
- The unique code snippet of code (to go onto the respective brand website)
- A set of customizations/settings for that widget
- All (of the multibrand) classic Web Widgets shareone Zendesk Chat account. The specific brand name is passed as a tag to Chat to display in the agent's chat window (for context) - it looks like this:


To add the widget to your brands in Zendesk Support
- In Zendesk Support, click theAdminicon (
 ) in the sidebar, then selectChannels>Widget.
 - On the Widget admin page, clickAdd widget.
- In the configuration capsule, use the drop-down menu to select the brand you want to add a widget to, then clickSave.
- Repeat these steps for any other brands to which you want to add a widget.
Now, on the Widget admin page, you can view and customize every brand that includes a Web Widget.
Step 3:Route chats to a department using the Web Widget
Once you’ve got the Web Widget enabled for each of your brands, you’ll need to set up your Chat account to support all the brands, then route the chats to each brand's department.
First you need to create a department and add at least one agent for each brand. SeeCreating a departmentfor information.
Next, you’ll need to create triggers to route chats to the right departments.
To create a routing trigger
- On your Chat dashboard, clickSettings > Triggers.
- ClickAdd trigger.
- Enter a name and description for the trigger, then customize it like the following example:
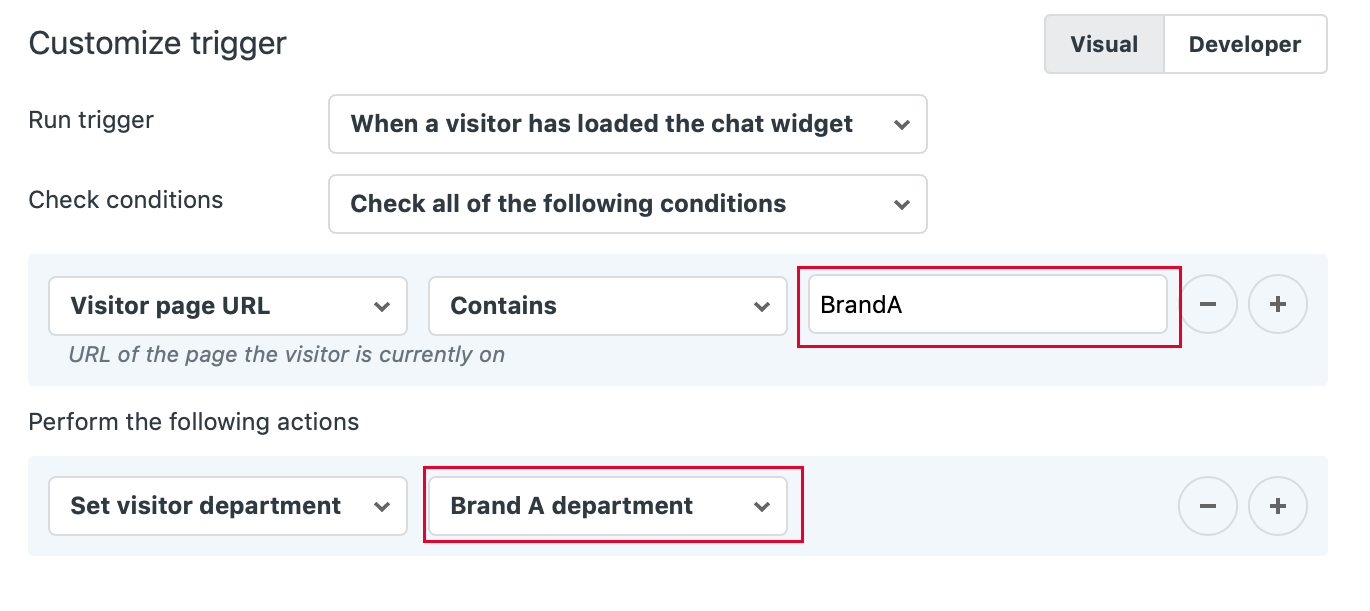
- ClickCreate triggers.

Step 4: Add the widget to your brand's web pages
当你建立你的品牌,部门nd triggers as described above, you'll need to add the Web Widget to every page you want
Here’s the API script you will need to add to your web pages:
The main difference is that the Web Widget automatically detects if the corresponding department is offline and offer only the contact form. The rest of the script remains almost the same.
For more information, seeAdding Web Widget (Classic) to your website or Help Center.
Step 5: Customize the Web Widget (Classic)
You may want to customize the Web Widgets to match your brands. You can do basic configuration through the Web Widget (Classic) settings page, and more advanced customization using the Web Widget (Classic) API.
For detailed instructions on customizing the widget, seeConfiguring components in the Web Widget (Classic)和Advanced customization of the Web Widget (Classic).
7 Comments
Hi,
In step 2, I can't see the picture of what looks like the tag to Chat display in the agent's chat window for adding context.
I've flagged the article to the team dedicated, thank you for notifying it.
Meanwhile, I'd be happy to show you the function highlighted.
Could you please confirm, you'd like to see where/how the tag associated to the brand is added/synced to the ticket via Chat?
请给更多的上下文。
Hi Marine,
Yes, I'm still interested to see how it works. As I have two websites, we want them to have a web widget but manage chats tickets distinctly between both.
Sure!
Let's say I have two brands, so I have two Web Widgets.
My first brand has the following domain URL:brand1.zendesk.com/hc- when a visitor reaches out from the Web Widget brand1, from the URL where the script is embedded, in the ticket, you should see a tag such as:
You can see above in the screenshot the tag "brand1" applied to the ticket automatically upon the ticket creation. The Web Widget brand1 will pass this tag, and for example the second Web Widget brand2 will pass the tag "brand2".
Looks like you are using Agent Workspace. Agents should see this tag from the Chat tickets on the left panel.
I hope this helps!
Marine,
Thanks for the information. So basically, I need to add a trigger on the URL from brand 1 and same thing for brand 2 in order to dissociate them ?
You can create triggers to differentiate your tickets per brand, surely.
Also, you need to 'brand' your tickets. Since you share a single Chat account for all brands, the system needs to know which brand needs to be applied on your tickets. The default one will apply to all tickets automatically.
To achieve this, you can create a trigger based on the tag for example.
Conditions and Actions for triggers are listedhere.
I hope this clarifies Andrew. If you struggle to make it work, feel free to contact our Support team!
Marine,
Okay all clear for me, thanks a lot for your help !
Pleasesign into leave a comment.