


This workflow example shows how you can leverage features in Zendesk Support to provide valuable services for your important customers. You can use this example as a starting point for managing workflows in your own account.
This recipe uses custom organization fields and ticket tags to manage the workflow. Alternatively, if your account allows it, you can use multiple organizations to manage a similar workflow. For more information, seeWorkflow recipe: Using triggers to manage requests from important customers (multiple organizations).
The example includes:
Workflow goal
Your company has important customers who provide over 40% of your business. You can use Zendesk to help you expedite and prioritize support requests from these customers to make sure they stay happy.
Creating a special group of agents to handle VIP customers
Groupscollect agents together, allowing admins to manage agent ticket assignments based on an agent’s special skills. For VIP customers, it’s good to identify senior agents on your team who are best-suited to help these customers.
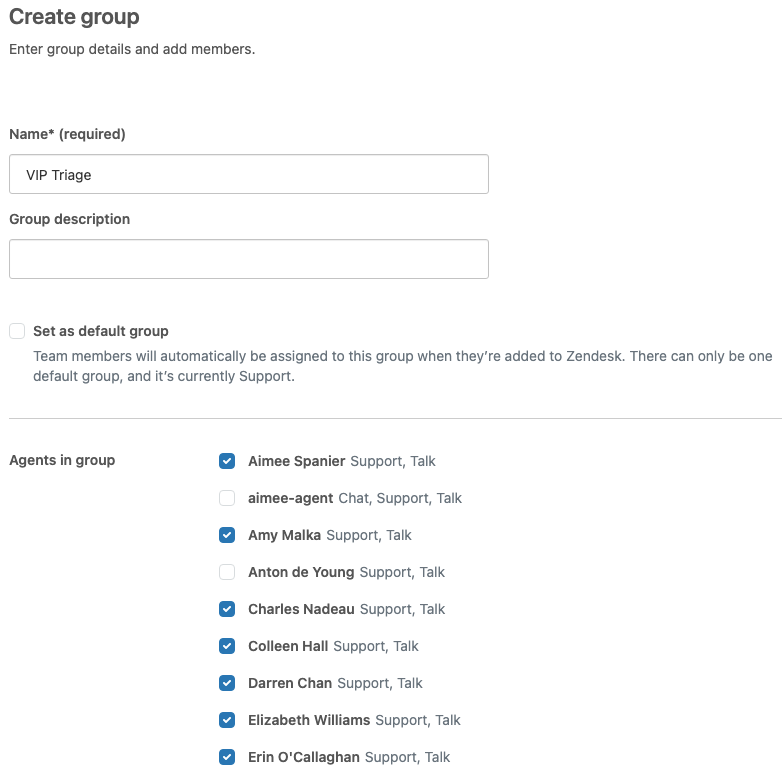
To create the group
- InAdmin Center, click
 Peoplein the sidebar, then selectTeam > Groups.
 - ClickAdd group.
- Enter a group name. In this case, name the groupVIP Triage.
- Select the agents you want to add to the group. Pick the senior agents who are best suited to handle important customers.
- ClickCreate group.
Identifying your important customers
Organizationsare meaningful collections of your end users. You can use organizations to group users from the same company or department and identify which organizations you consider to be VIP customers.
Steps to do this include:
Creating a custom organization field
To provide special treatment for your VIP customers, create a custom organization field to help you identify which organizations are VIP customers. When you use the custom org field to identify VIP customers, tickets submitted by them are automatically tagged as important.
To create a custom organization field
- InAdmin Center, clickPeoplein the sidebar, then selectConfiguration > Organization fields.
In this case, you’ll add a simple checkbox to enable you to flag VIP customers.
- From the list of available fields, drag aCheckboxto theActive fieldsarea.
- Add the following information to the checkbox.
- Field title: VIP Customer?
- Field key: vip_customer_
- Description: Select this checkbox if the organization is considered a VIP customer.
- Tag: vip_customer

- ClickCreate field.
After you create the custom field, you can choose which organizations qualify asVIP客户.
Identifying your VIP organizations
For each organization on your site, click theVIP customer?checkbox for any organization you consider to be a VIP customer. You can do this when you add a new organization (or edit your existing organizations).
To add a VIP new organization
- InSupport, click theOrganizationsicon (
 ) in the sidebar.
 - ClickAdd organization.
- Enter the organization's name in theNamefield. In this case, name the organizationWriters Plus.
- Enter theEmail domains(separated by a space) of your VIP customer.
Users from these email domains will be automatically added to this organization when they submit a request for the first time or register.
如果相同的域添加到多个组织ns, users are automatically mapped only to the first organization sorted alphabetically by name. For details, seeAutomatically adding users to organizations based on their email domain.
- ClickSave.

The new organization is added and the organization details appear.
- Select theVIP customer?checkbox to show that members of the Writers Plus organization are VIPs.

When you select theVIP Customer? checkbox,thevip_customertag associated with this checkbox appears in the organization’sTagsfield, and any tickets sent from users with awritersplus.comorwritersplus.netemail address will be tagged withvip_customer.
Now you can use this tag to trigger a special workflow for tickets sent from Writers Plus and your other VIP customers.
Adding triggers to respond instantly
Triggers are business rules you define to run immediately after tickets are created or updated. Once you have set up your VIP agent group and identified your VIP organizations, create atriggerthat:
- Instantly replies to your VIP customers as soon as they submit a ticket
- Gives the ticket a high priority.
To add the trigger
- InAdmin Center, click
 Objects and rulesin the sidebar, then selectBusiness rules > Triggers.
 - ClickAdd trigger.
- Enter the following information for the trigger.
For the triggerNameandDescription:

For the triggerConditions:

For the triggerActions:

- When you’ve finished adding the trigger name, description, conditions, and actions, clickCreate.
With this trigger, when these conditions are met:
- The ticket is sent from a customer in a VIP organization.
- A new ticket is created.
- The ticket hasn’t been solved, yet.
The following actions are performed:
- An email notification is sent to the ticket requester. See example below.
- The ticket priority is set toHigh.
- The ticket is assigned to theVIP Triagegroup.
The following is an example of an email notification sent to a VIP customer who submits a ticket. The ticket has been assigned to theVIP Triagegroup and the ticket priority isHigh.

Creating a view to monitor VIP ticket status
Viewsdynamically organize tickets based on specific criteria that you define. Using views can help you determine what tickets need attention from you or your team and plan accordingly. To keep an eye on how our VIP tickets are progressing, create a shared view that you and other members of your team can use to monitor ticket status.
To create the view
- InAdmin Center, click
 Workspacesin the sidebar, then selectAgent tools > Views.
 - ClickAdd view.
- Enter the following information for the view. ThisVIP Triageview will show any unsolved tickets that are taggedvip_customer.

- To test your view conditions, clickPreview match for the conditions aboveto see which tickets will appear in the view.

- Scroll down to theFormatting optionssection to customize the table columns that appear in the view.
- Because it’s important for you to quickly see when a ticket was last updated for VIP customers, drag theLast updatecolumn from theColumns not included in tablelist to theColumns included in tablelist.

- Make sure the view isAvailableforAll agents.
- ClickCreate view.
一旦你创建view, you can click the Views icon (![]() ) in the sidebar, then selectVIP Triageto view your VIP ticket status. This view includes when the tickets were lastUpdated.
) in the sidebar, then selectVIP Triageto view your VIP ticket status. This view includes when the tickets were lastUpdated.

Automating to ensure ticket follow up
To help manage your ticket workflow, you can automatically remind agents if an important ticket hasn’t been assigned in a timely manner. In these cases, use anautomation, instead of a trigger to send the reminder.
Triggers are event-based business rules that can fire every time a ticket is created or updated. Automations are time-based business rules that perform an action in your account based on time elapsed.
To add the automation
- InAdmin Center, clickObjects and rulesin the sidebar, then selectBusiness rules > Automations.
- ClickAdd automation.
- Enter the following information for the automation.
For theAutomation titleandConditions:

For the automationActions:

- When you’ve finished adding the automation title, conditions, and actions, clickCreate automation.
With this automation, when these conditions are met:
- The ticket was sent to theVIP Group.
- The ticket priority isHigh.
- The ticket was created more than2 business hoursago.
- The ticket does not have an agent assigned, yet.
The following actions are performed:
- An email notification is sent to all members of theVIP Triagegroup. See example below.
- The ticket priority is changed fromHightoUrgent.
The following is an example of an email notification sent to members of theVIP Triagegroup when the automation conditions are met. The ticket priority has changed toUrgent.

Other useful automations include reminding agents if a ticket hasn’t been solved after a certain period of time, gently reminding customers who haven’t replied to an agent request for more information, and so on. To learn more about automations, check out the default Zendesk automations available in seeAbout automations and how they work.
0 Comments
Pleasesign into leave a comment.