


You can view all of your system and custom ticket fields on theTicket Fieldsadmin page. There you can browse, search, and filter your ticket fields. You can also change the display of ticket fields on the page.
You must be an administrator to access and view your ticket fields in theTicket Fieldsadmin page.
This article contains the following topics:
Related articles:
Accessing the Ticket Fields admin page
All ticket field-related management tasks happen on the Ticket Fields page.
To access the Ticket Fields page
- InAdmin Center, click theObjects and rulesicon (
 ) in the sidebar, then selectTickets > Fields.
From here, you can browse, sort, search, and filter your ticket fields. You can alsoexportticket fields.
Browsing the ticket fields list
Ticket fields are divided by activation status. The default view on the Ticket Fields page is the list of Active fields. You can view fields that have been deactivated by clicking the Inactive tab.
By default, ticket fields are listed in the order they were created. If you have a large number of fields, the list will be paginated. You can scroll through the pages using the controls at the bottom of the page:

Searching the ticket fields list
You can search your list of ticket fields by entering a search value into the search box at the top of the page:

- Titles, the name given to each ticket field, including partial titles
- Field IDs, unique numeric identifiers given to each ticket field, including partial ID numbers
- Ticket field values, The values created in a drop-down or multi-select field.
Modifying and sorting on columns
You can customize the information displayed on the Ticket Fields page by adding columns to, and removing columns from, the fields list.
Initially, there are four default columns applied to the fields list: Title, Field ID, Type, and Date modified.
The following columns may be available for inclusion in the fields list:
- Active forms, the number of forms a ticket field appears on. You can hover over the number to view a list of the forms using that field.Note:This column is only available to customers on Support Enterprise and Zendesk Suite Growth plan and above.
- Field ID, unique numeric identifiers given to each ticket field, including partial ID numbers
- Type票字段的格式(下拉,multi-select, numeric, and the like).
- Created by, the admin who created the field.
- 创建日期, the date the field was created.
- Date modified, when the field was last edited.
- Permissions, including:
- Editable for end-users
- Visible for end-users
- Required for agents
- Required for end-users
When displayed, the permissions options applied to the field are indicated by a check mark.
To add a column to the ticket field list
- On the Ticket Fields admin page, click theoptionsicon (
 ) in the upper right to display the list of available columns. Columns currently applied to the list are indicated by a blue check mark.
 - Click the column(s) you want to apply to the ticket fields list. The column is immediately applied to the list.
To remove a column from the ticket field list
- On the Ticket Fields admin page, click theoptionsicon () to display the list of available columns. Columns currently applied to the list are indicated by a blue check mark.
- Click the column(s) you want to remove from the ticket fields list. The column is immediately removed from the list.
To sort your ticket fields by column
- Click the name of the column you want to use to sort your ticket field list. The list is reorganized based on the information in that column.
- Click the column name again to reset the sort order.
Filtering the ticket fields list
The Filters drop-down, located next to the Search box, allows you to display only those ticket fields that meet certain criteria, including:
- Permissions, including Agents only, Read-only for end-users, and Editable for end users
- Requirement settings, including Required for agents, and Required for end-users.
- Field type票字段的格式(下拉,multi-select, numeric, and the like)
Creation source, including Created by app, Created by admin, and Created by system
You can apply multiple filters to the list. If you use more than one filter, they are applied as an OR statement - that is, choosing theType > textandCreated by appfilters will display all text-type ticket fields, regardless of their creator, as well as all fields created by an app, regardless of their field type.
ti应用过滤器cket field list
- Click theFiltersdrop-down menu. Currently-applied fields are indicated in the drop-down list by a blue check mark, and are displayed below the search box:
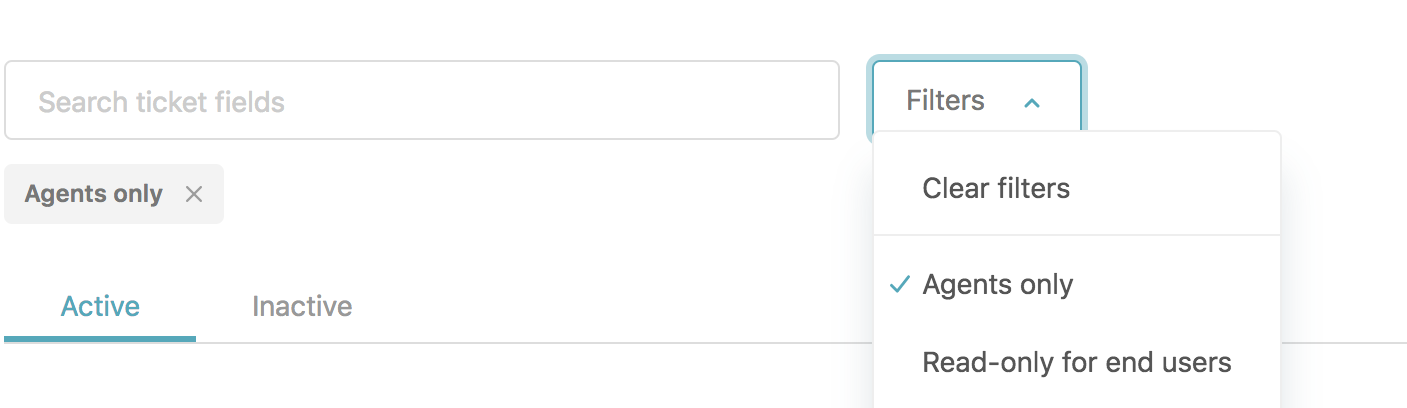
- Click the filters you want to apply to the ticket field list. The filters are applied immediately.
To clear individual filters applied to the ticket field list
- Click thexby the label name under the search box.
To clear all filters applied to the ticket field list
- Click theFiltersdrop-down menu, and selectClear filters.
2 Comments
Is there a way to manually set the order that the fields will show on the front end? For example - we currently created a new custom field and it is correctly showing on the new request page that our users get to from the Submit a Ticket link in our Guide. The field is at the bottom of the page and we would like to move it closer to the top but we didn’t see how we could set the order of the fields. Thanks!
Hey,
This article might help you:https://support.zendesk.com/hc/en-us/articles/231864467
Pleasesign into leave a comment.