Building your first Chat app - Part 1: Laying the groundwork
In this five-part tutorial series, you'll learn how to build a Zendesk Chat app from start to finish. The app you'll build is called Learn More. This tutorial covers the first steps to building the app:
The other tutorials in the series teach you how to build and install the app:
- Part 2 - Designing the user interface
- Part 3 - Creating and inserting templates
- Part 4 - Getting data
- Part 5 - Installing the app in Zendesk Chat
Because the tutorials build on each other, tackle them in order and finish each tutorial before moving on to the next one.
To download the completed source code of the app in this tutorial, clicklearn_more.zip. You can review the code as you follow along or check your work.
Note: Zendesk provides this article for instructional purposes only. Zendesk does not provide support for the content. Please post any issue in theZendesk Apps framework (ZAF) community, or search for a solution online.
What you'll need
To build and upload a private app in Chat, you must have Zendesk Chat on the Zendesk Suite Growth plan or above. Your Chat account must also be linked to a Zendesk Support account.
Planning the app
You should have a good idea of how your app will look and work before you start working on it. The app you'll build in this tutorial is called Learn More and is designed to let a chat agent send a visitor links to more information about any subject. It'll have a simple interface consisting of a search box and button. Here's a mockup of the user interface:
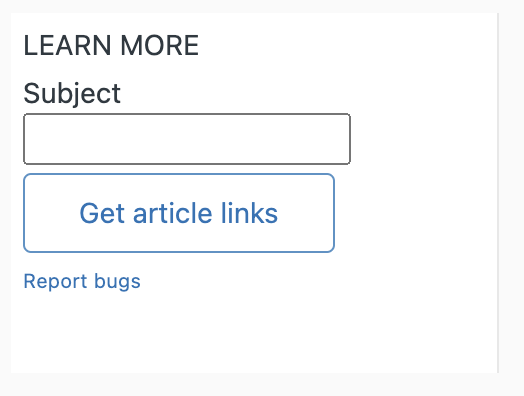
The app will appear in the sidebar on the right side of the agent's chat interface.
The app should work as follows:
At any time during a chat, the agent enters a subject in the app's search box and clicks Search
The app makes an HTTP request to the MediaWiki API for the top 3 articles on Wikipedia about the subject
The app inserts links to the 3 articles directly in the chat's text area

The agent presses Enter to send the links to the visitor

Installing ZCLI
In this section, you'll install the Zendesk Command Line Interface (ZCLI). ZCLI lets you:
- Automatically create all the necessary files and folders for a new app
- Test your app locally in a browser
- Validate your app
- Package your app for upload
Installing ZCLI is a one-time task. Once installed, you can use ZCLI for all your Zendesk app projects. Follow the instructions inInstalling and updating ZCLI. You also need to authenticate ZCLI with your Zendesk account. SeeAuthenticationin the ZCLI documentation. After you're done, return here to continue the tutorial.
Note:ZCLI replaces the Zendesk Apps Tools (ZAT), which are in maintenance mode. To use ZAT instead, refer toInstalling and using ZAT.
Creating the app files
After installing ZCLI, you're ready to start building the Chat app. The first step is to create the starter files for a new app calledLearn Morein a folder calledlearn_more.
Create the app files
In your command-line interface (the command prompt in Windows or Terminal in Mac OS X), navigate to the folder where you want the app files to be saved in a subfolder.
Use thecdcommand (for change directory) to navigate to a child folder. Example:
cd projectsRun the following ZCLI command:
zcli apps:newAt the prompts, enter the following values:
- Directory name:learn_more
- Author's name: Your name
- Author's email: Your email address
- Author's website: Leave blank and press Enter.
- App name:Learn More
ZCLI creates app starter files in thelearn_morefolder.
Open your file browser and navigate to the files.
The folder contains anassetsandtranslationsfolder, plus amanifest.jsonandREADME.mdfile. You can add as many files as you need when you're building your app, but for now it's all you need to start building an app.
Because it's an iframe app, you can host the app in Zendesk Chat or on a remote server with any technology stack you prefer. If you're only using client-side technologies, as you will be here, you can simply host it in Zendesk Chat.
Everything is in place to start building. In the next tutorial, you'll learn more about the HTML file to be iframed into the chat window. You'll change the heading, add a footer, and add some styles to meet the design requirements specified inPlanning the appabove. Get started:Part 2 - Designing the user interface.